

Like I said the other day, these stencils have huge possibilites. Once again, I have used them in an unconventional way. I love how you can also use different products with them to get a different look.
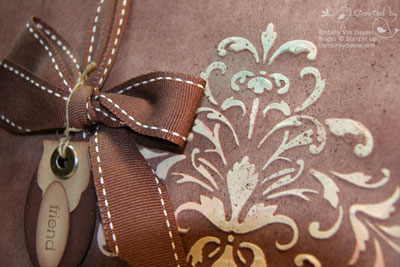
My first sample is a tile. I have shown many tiles over the last couple of years and here is just one more way to make these beautiful tiles.


On this tile I used the Kind Thoughts Stencil and Craft Ink Spots to sponge all around the inside of the stencil. You will notice many different colors and these came from the Earth Elements Ink Collection. Once you have the stencil complete, sprinkle Glassy Glaze over the wet ink. Bake in your oven at 350 degrees for 10 minutes and let cool. Glassy Glaze is an embossing Powder that Stampin’ Up! carries. You can shop with me and have it straight to your door step to make your own tiles by clicking on the SHOP NOW button at the top right of my blog.
The other fun stuff on the tag just adds to the tile. The sky is the limit on these beautiful tiles. You can view the supply list at the end of this post.
For the next project, I used a Stampin’ Up! chipboard journal and stencil paste.

Again, this would make a fine gift for any friend or Mother. Ink your journal using a sponge and classic ink first. Once that is dry you are ready to try your stencil with the stencil paste. By placing your stencil on the journal, follow the directions on the paste bottle. It has to dry about two hours. Once it was dry I took a sponge with Baja Breeze ink and inked over the Stencil paste. It love how it turned out. Then embellish your journal. As you can see, the stencils really are a fun product with so many uses.
Tile Materials:
Stamps: Great Friend
Cardstock: Kraft, Old Olive
Inks: Chocolate Chip, Ruby Red Classic Inks. Old Olive, Really Rust, Chocolate Chip Craft Ink Spots
Accessories: Kind Thoughts Stencil Small, Button Latte, Chocolate Chip Corduroy Buttons, Linen Thread, Oval Scallop Punch, Ribbon, Paper Piercer & Mat Pack, Lots of Tags Sizzlets, Big Shot
Journal Materials:
Stamps: Wonderful Favorites
Cardstock: Chocolate Chip, Kraft
Ink: Chocoloate Chip, Baja Breeze
Accessories: Kind Thoughts Stencil Small, Stencil Paste, Ribbon, Jumbo Eyelets, Wide Oval Punch, Small Oval Punch, Linen Thread, Lots of Tags Sizzlets, Big Shot, Spritzer Tool, Crop a Dile, Paper Piercer
All Supplies Stampin’ Up! unless otherwise noted!


9 thoughts on “More fun with Stencils!”
Hi Kimberly, I’m glad you’re back I missed you for a coule of weeks!!! I LOVE these projects what great ideas!!!! I have one question what type of tile should be used for this type of project? Keep up the awesome work! Thanks for sharing you awesome ideas.
WOW! Those two projects look absolutely amazing! I love the shabby chic you have achieved, it looks incredible! Thanks for sharing!
Cindy
Wow! These are stunning! You’ve pushed me over the edge to order this stencil and try it! Thanks for sharing your ideas with all of us!
Just beautiful, Kimberly. You do outstanding work!
Both of these projects are awesome. I really like the multiple colors on the embossed stencil.
Love the tile. Beautiful. Thanks for sharing! I’m tempted now to purchase the stencil!
Kimberly!!!! The tile is AMAZING! I love it!!! You’re oberliciously talented and this just seals the deal!
WOW.. really stunning and so amazing! I love it! 🙂
Beautiful projects Kimberly.
Just wondering what is stencil paste and where did you get this or di you make it?
Comments are closed.