

First I want to express my sincere sadness of the passing of Steve Jobs, Co-Founder of Apple. I've talked so much about the silly iPod the last few weeks and how grateful I am they replaced it for FREE. I cannot help but think how much this man will be missed by so many. He was a creative genius and changed our world in computers and electronics. I love Apple products and he has definitely changed my life for the better.
As I said the other day I would have a tutorial ready for you on how to make the Halloween Tree Decorations. I am so excited that day is TODAY! Halloween is one of my favorite holidays to stamp and every year I add a few new decorations to my tree and my Halloween display. Let me share my Halloween display as well as the tree.

What's fun about this display is the many memories that go along with the items made. So many of these fun decorations were made sitting with friends or even a class that I have taught. Every year it's a joy to pull out each decoration and put it on the display. What's better is adding more decorations. My display consists of a Bakers Rack that I change out every season. There is another project on my display I cannot wait to show you. It's a banner that I made with my friend Denise. We had so much fun creating it. I'll share much closer pics soon.
Here a closer look at my tree.
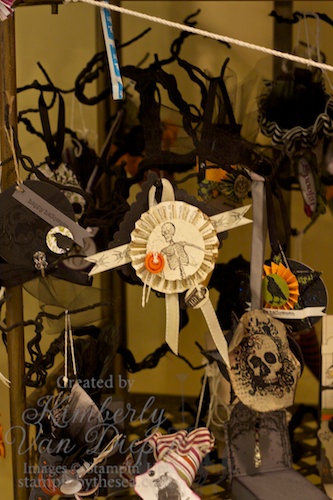
You can see many of the decorations I've made over the years. On the video you will see another Holiday Decoration with the same concept only it's a Christmas Ornament. Here are a few closer pictures for you:

.jpg)
I used the Christmas Lodge stamp set for this decoration. You can find all the products I've used here in my Online Store. Make sure you check the Clearance Rack. There are some great holiday items you can get at a GREAT discount. Don't miss it.
Here is the video and I hope it helps you as you make a few handmade decorations fro yourself.
httpv://youtu.be/b6O_cYgXfqY
The weekend is almost here!
XOXOXO


12 thoughts on “Halloween Tree Decoration Tutorial”
These are so stinkin cute, I need to get a simply scored this was the one that sealed it. Have a great Weekend, Thanks Kimberly,
xoxo Nancy
eeeeeeeeeeee! these are soooo awesome! 🙂
Always love your videos showing how easy your creative ideas are….THANK YOU for both!
thanks for the share…love Hallowe'en more this year than ever; thanks for the tutorial; as always, luv them!
Love the video my friend!! I can't wait to make some of these!!
Hugs!!
Love them both. So glad to see you doing videos again! Thanks for sharing those great ideas. Just beautiful!
I just have to tell ya I have tried and tried to do these rosesettes?lollis ? ans couldnt get them TILL I watched your video THANK YOU THANKYOU I did it now Please keep the videos coming I LOVE your stuff if I wasnt already a demo I would join under YOU have fun with your parents and cant wait till you blog again.. Thanks again Louise(WEEZIE)
You're so amazing!!! I'm speachless!
Thanks Kimberly! I was trying to figure out how to keep the 'yoyo's stuck together in the middle! I never thought of using a glue gun! Duh! Thanks so much and have a wonderful weekend! 🙂
That Christmas Ornament is rock'n! So beautiful. You have some amazing work here Kim.
Pingback: Happy Halloween! | StampinByTheSea.com
Pingback: EIN WEIHNACHTLICHER GESCHENKANHÄNGER « Margits Schatztruhe
Comments are closed.