

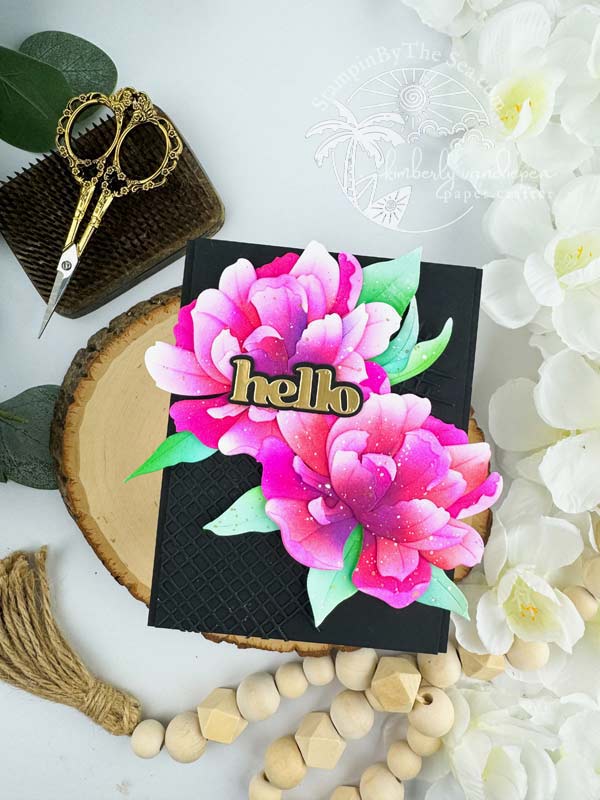
I’m still in experimentation mode. After playing with another die cut earlier this week and layering color, I’m back at it with these gorgeous flowers from Altenew. Oh how I love this flower and the massive pop of colors. It’s amazing how much beauty can come from layering ink colors. Like I previously stated in THIS post, I am channeling Jennifer McGuire and Jaycee Gasper’s video where Jaycee shared layering inks to create a vibrant look. Man, he wasn’t kidding. The results are pretty amazing!
Let’s Create!
To create this card I started with multiple die cut flower pieces using the Pink Star Tulip Die Set. This layering die is incredible once it all comes together. The best part is Altenew’s keyhole die cut system which takes ALL the guess work out of how these flowers come together. Once they were die cut, I placed them on my large Ultra Sticky Mat Grid from Altenew and began to ink blend each of the die cut layers. Using the guide, I could tell where I needed to be more bold with color or scale back for a softer look.
I used Amy Tangerine’s Ink Summer Dreams Collection from Altenew which worked perfectly to give a bold look to these flower petals. The colors I used are as follows:
Berry Cool, Easy Breezy and Lettuce Celebrate inks for each of the leaves.
Tickled Pink, Cherry Sweet and Be Grapeful for each of the petals. The Be Grapeful was perfect to add a darker shading to the inside of the petals.
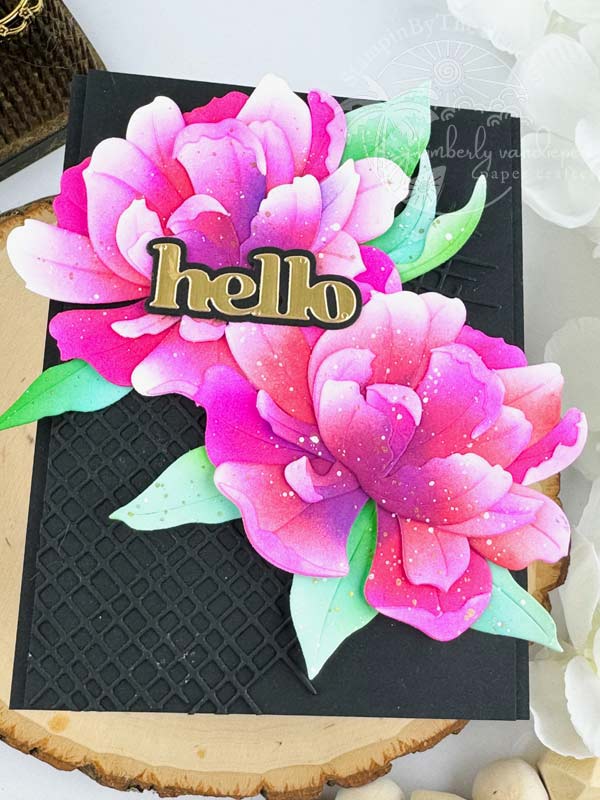
I struggled at first once the flowers were glued together on where to place the flowers to create the card. I wasn’t sure what background I wanted to use until I finally decided on black cardstock paired with the Burlap Textured Die. I love the black on black look and that burlap die is SO fun. Last I used the Versatile Greetings Die Set for my sentiment using Altenew’s Brushed Metallic Gold cardstock. It’s devine and really helped the sentiment stand out. It’s hard to believe this card doesn’t use any stamps, just die cuts.
Finishing the Card
The finishing touches for this card was adding a little ink splatter using white and gold pigmented inks. But here is where I had a little problem and card surgery was needed. I’m sure you can relate…
- First problem- over splattering the base of the card. Sometimes the splatter can be too much. I always say, “Too much of a good thing is a bad thing!” I peeled the base of the card off carefully and regrouped.
- Second surgery… I completely placed the card panel onto the card base crooked. Sigh… Once again, I took it apart and started over.
- Third surgery… My cutest and sweetest kitty thought the leaves looked yummy. Thankfully I had a few spares on my desk to replace the ones she thought were tasty. I’ve come to realize, I need to put away my loose paper or she’s just not allowed to play in my craft room.
Despite these challenges, the card was completed and turned out great. I hope by keeping it real, you are encouraged to not be quick to throw it away and just perform a little card surgery. In the end, it will work out!
Thank you for taking time to read today. I hope you enjoyed today’s card!


