


Lemon Or Lime? You Choose!
When I started to create with the products for OnStage, I was a little stumped with the Lemon Builder Punch. No lemon stamps so what in the world will I create?? After a little thought (or maybe a lot) I thought about my cocktail tree I have in my backyard. The tree is called a cocktail tree because it produces three types of Fruit: Lemons, Limes and Naval Oranges. It’s pretty impressive, and we have lemons and limes growing already.
I gathered some supplies and went to work.
Tips for a Simple Lemon Card

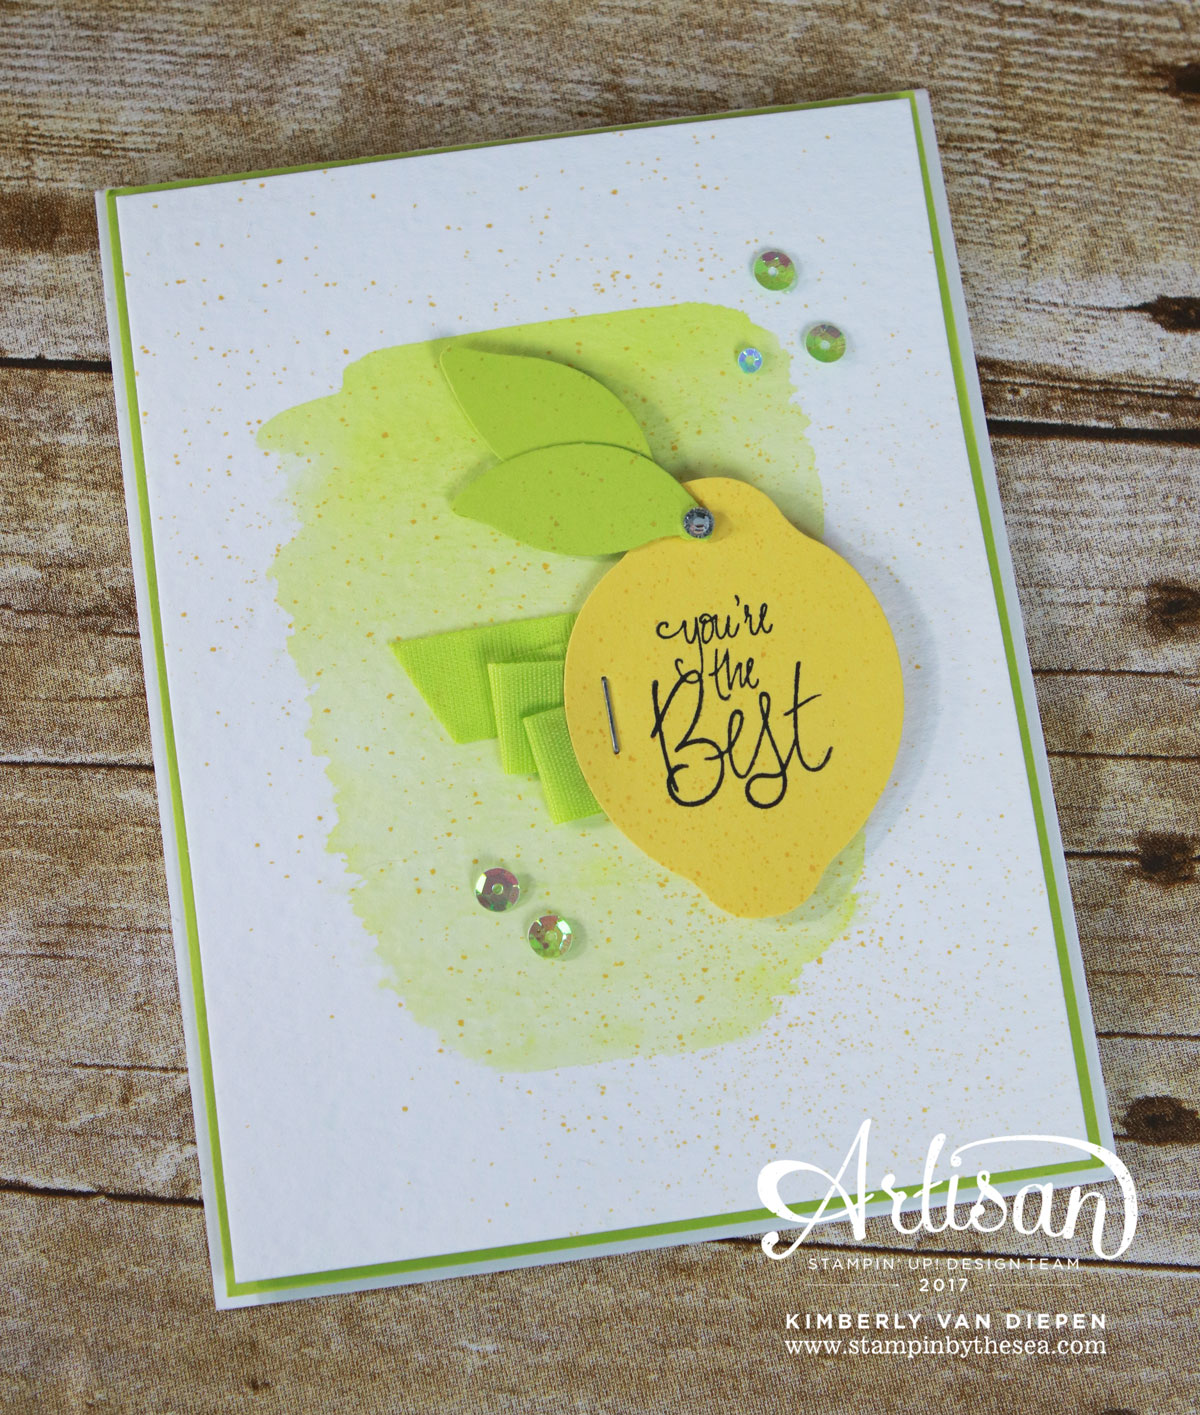
Starting off this card I think I was more excited to use the Lemon Lime Twist ink. Seriously, it’s my favorite ink color right now.
Here are some quick and easy tips for creating this card:
- I used an Aqua Painter to brush over the center of the Watercolor Paper to get my paper nice and wet. Then I go over the center again using the Aqua Painter loaded with Lemon Lime Twist ink. When you have the surface of the Watercolor paper nice and wet, this makes the blending much easier. I love how the ink moves beautifully over the paper by using this trick.
- When I stamped the greeting from the Label Me Pretty stamp set I used Daffodil Delight cardstock and then used the Lemon Builder punch. I punched the leaves of the lemon using the Lemon Lime Twist cardstock and added to the Lemon punched image using a Mini Glue Dot.

- Another fun addition to this card is the Lemon Lime Twist 1/2″ Finely Woven Ribbon. When I used this ribbon, I love how easy it is to fold, and my card is not bumpy at all. I know this makes my mailing a bit easier and my postal lady happy. I used a staple to keep it in place. Super simple and fast.
- Lastly, after I added the lemon image to my card with dimensionals, I used a new Sequin Assortment called Iridescent. Want to know my favorite part about these sequins? Look at the tiny sequin. That made me squeal. Not kidding.

Mix it Up!
One of the things I love being a display stamper is the challenge. Like I said in the beginning, I didn’t have the coordinating stamp set for the Lemon Builder Punch. I was left wide open to think outside of the box and create. Don’t get me wrong; this can be scary at times. I mean really, what greeting would work with this lemon?
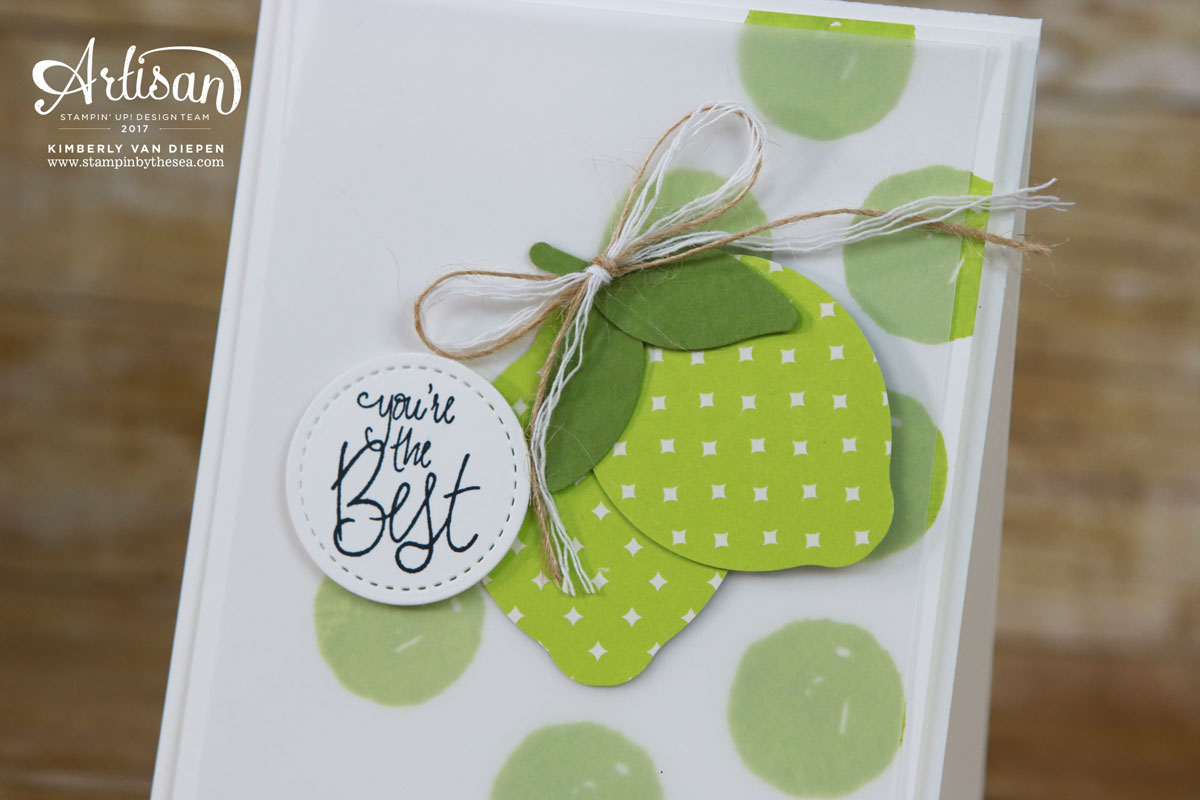
Interestingly enough, I thought the Label Me Pretty greeting, “You’re the Best” worked perfectly. I think of making lemonade out of lemons… it’s simply the best! Right?
Consequently, I should tell you that my eyes spotted a fun lemon/lime stamp set in the new catalog. It’s going to be one that I will use frequently!
Lemonade or Limeade?

After I had created the lemon card, I knew I needed to make a lime. I’m not sure if lime’s looked much like this, but I have a great imagination, and I hope you do as well.
As I started this card I pulled out my Orange Blossom stamp set again and made a fun polka dot background using Lemon Lime Twist ink onto Whisper White. Remember, the polka dot image is really an orange… imagination friends, imagination!
Tips & Tricks
Here are a couple of tricks to create this card. Remember, even if you do not have these stamps or punches, imagine the card with products you do have. Think of my card as a sketch!
- I layered a piece of Vellum Cardstock over the Whisper White card base. I love how this looks on a card. If you haven’t worked with Vellum, I strongly suggest trying it. I have found that Stampin’ Up!’s Vellum cardstock has a perfect weight and it’s easy to use.
- When adding a bow to the lime’s, I didn’t want anything bulky. I started by taking a piece of Linen Thread and White Thick Bakers Twine and pulling apart some of the thread. This made the bow nice and flat. I love the mix of color, too.

- Lastly, I used the new Eastern Palace Specialty Designer Series Paper to punch the lime’s from the Lemon Builder Punch. The Eastern Palace DSP is SO beautiful.
Be Inspired!
You know the old saying, when life hands you lemons, make lemonade! While I definitely didn’t get handed lemons, starting this project was not easy. I think I made a little lemonade and I’m excited how these projects turned out.
Can you believe we are on Day 8 of sharing? I have to say, this blog hop has been over the top with the projects being shared and I hope you have enjoyed it as much as I have. If you have missed a few days, click HERE to start. You won’t be disappointed.
Next, hop over to see what the rest of the Artisan Display Stampers have created. Simply click the button below.
Aurelie Fabre
Cathy Caines
Sylwia Schreck
Dani Dziama
Jessica Winter
Kimberly Van Diepen
Maike Ulbrich
Martha Inchley
Shannon Lane
Tanya Boser
One more thing, are you looking for new ideas?
Check out my tutorial library with tons of fantastic ideas to get your creative mojo moving all in the comfort of your home! Simply click the image below to check it out.


7 thoughts on “Lemon Or Lime? You Choose!”
Pingback: Mini-Klemmbrett in Limette und Anthrazitgrau - Artisan Design • kreativ-format
Loving what you have done with the punch! And the Orange Blossom circle, I always need a good circle image, so I can make my own polka dots and such. And now I want a Cocktail tree too, lol!
How do you attach your sequins? I never bought any because they seem like they would be a pain to attach to a card. Any tips/tricks would be appreciated.
Patti, I use the Fine-Tip Glue Pen from Stampin’ Up! It’s perfect to create tiny dots on your project and then I lay the sequin on top of it. The glue is a nice strong hold as well. Hope that helps you and you try it. Sequins are definitely one of my go-to embellishments because they are inexpensive and lots of colors.
hello there- i am desperately trying to find a lemon/lime punch for my upcoming wedding for the escort cards… wondering if you can help as this lemon/lime shape you have looks perfect!?
Hey Jessica,
I just emailed you back about this punch. 🙂
Hi, I too am looking for a lemon punch! What did you use and where do I find it? Thanks in advance!
Comments are closed.