

Maybe we're not really dancin', but we are Two Steppin'. Two Step Stampin' that is!! Here is another embarrassing fact-o about me- It's been forever since I've used a Two Step stamp. Then once I pulled it out and played with it again I fell in love all over. My workshop hostess wanted me to show a Two Step stamp and I loved this because it made me Two Step. Ha! It's SO nice having clear stamps to make this technique much easier. If you do not own Clear stamps then you can use a Stamp-a-ma-Jig with your wood stamps to make the process seamless.
I used the Awash with Flowers stamp set:


When this stamp set came out it was not on my favorite list. After I made this simple card, it's totally on it! I plan to mass produce this one!!
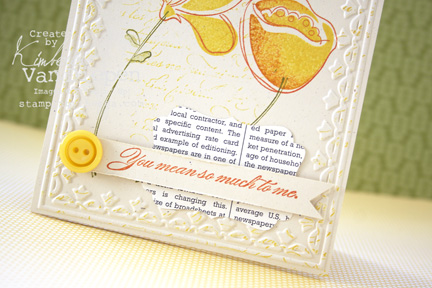
I started this card using Naturals Ivory cardstock as my card base. I cut another piece of Naturals Ivory 4 1/4 x 5 1/2 and ran it through my Big Shot using the Framed Tulips Embossing Folder. Using this embossing folder gave me plenty of room to stamp in the center of the frame. I stamped the stems in Old Olive ink. I stamped the first solid floral image on the right using Daffodil Delight ink. The second floral image I used a Rock n Roll technique. Stamp your Daffodil Delight first and then roll the edges of the inked image in Pumpkin Pie. Ohhhh Wee… already it's looking pretty. Now comes the Two Steppin'. Take the floral outline images and stamp them over the solid floral images using Tangerine Tango.
Using a background stamp like En Francais, ink it up using the Daffodil Delight and lightly press the stamp over the stamped floral images. Because you are stamping this over the Textured Embossed area the impression is hit and miss and gives this card a really nice vintage feel.
Stamp your banner using the sentiment from the Blessed Mother stamp set. Punch a Decorative Label using the Decorative Label punch from the Newsprint Designer Series Paper. Snail this onto your card from in the bottom right corner. Adhere your banner over this. Add a Daffodil Delight button to your banner using a Mini Glue Dot and your card is complete.
Again, it's as simple card but one I'm super pleased with. You can find all the supplies to make this card by checking out my Online Store. Make sure you check the Clearance Rack from time to time, too!
I hope your weekend is fantabulous. Check back tomorrow when I share my Workshop Bloopers and what happens when you forget a VERY important product. <smile> I'll share the card above again and how we fixed it without the product we needed and the other projects we made. I think you will like it!


5 thoughts on “Come Dance with Me!”
This card is very lovely. I need to get me stamps set out and play with it also.
By the way…. I got my Stampin Success magazine in the mail yesterday…Is that you in the picture on the back cover????
Really pretty card thanks for reminding at least some of us about the Rock'n'Roll
technique…!
Very pretty and springy Kimberly!!
Love it.
Pingback: Stampin' Up! Workshop Bloopers | StampinByTheSea.com
Love this card! I recently found your blog and really love your style!
Comments are closed.