

Mother’s Day Box & Mini Album
Mother’s Day is around the corner and this could be the first time I’m ahead of the game in preparation of my sweet Mother’s gift.
Welcome to another Artisan Blog Hop too. Boy, will you be inspired by these talented ladies.
A Packaged Deal

I’ve known for awhile what I wanted to create for my mom on Mother’s Day. Since she doesn’t keep up with scrapbooking herself, I love to create little mini albums filled with “short stories” so she can remember little moments in time. She has these scattered in her home and we all love to look back on these memories.
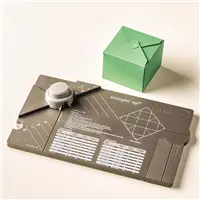
I started with the box using the Gift Box Punch Board from Stampin’ Up!
What was once a dust bunny collector is becoming a well loved treasure in my stamp room. Today’s box is my favorite because the size is perfect and it’s universal for SO many small trinkets. Just happened that it was perfect for a Mini Album too. WIN!

Create It!
Today’s video will teach you how to create the box and a few tips and tricks when embellishing the outside of the box.

Supplies needed to create the box and embellish:
- 8 x 8 Kraft cardstock
- Birthday Bouquet Designer Paper 2 x 12
- Blushing Bride cardstock 1 x 11
- Watermelon Wonder 3-1/4 x 3-1/4 (Punch 2-1/2″ circle)
- Typeset Designer Paper 1/4 x 6
- Kraft Corrugated cardstock 1/4 x 4-1/4
- Vellum Cardstock (die cut circle using Circles Framelits) I also textured embossed with the Softly Falling TIEF.
- Basic Black cardstock scrap
- Shimmer Paper 5 x 5
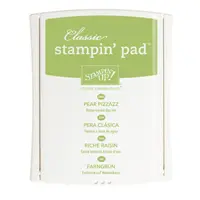
- Watermelon Wonder, Pear Pizzaz, Daffodil Delight, and Mossy Meadow inks
- Blender Pen
- Tea Lace Doilies
- Jute Ribbon
- Gift Box Punch Board
Supplies needed for the Mini Album:
- Kraft cardstock 3-1/2 x 10-1/2 (2 pieces needed)
- Basic Black cardstock 3-3/8 x 3-3/8
- Whisper White cardstock 3 x 2-1/2
Here is the inside of the box. The mini album is attached to the bottom of the box with dimensionals.


As I state in the video, I wanted to keep the mini album fun with a bit of humor. Most of the time when I create mini albums for my mom they are sappy and then she is a mess with tears. I wanted her to chuckle a bit and a few of these photos/journaling will definitely do that.
The best part about this box is there is still plenty of room to put a bracelet inside that I purchased for her.

Creating the Card
The card was created to coordinate with the belly band of the box.
Here is how to create card:
- Fold Whisper White cardstock (4-1/4 x 11) in half. Attach Birthday Bouquet DSP (3-7/8 x 5-3/8) to a piece of Whisper White cardstock (4 x 5-1/4) using Fast Fuse. Adhere to card front using dimensionals.
- Adhere a piece of Blushing Bride cardstock (1 x 4-1/4) across the DSP using dimensionals. Adhere Kraft corrugated cardstock (1/4 x 4-1/4) across Blushing Bride cardstock.
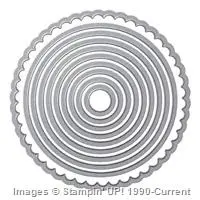
- Tear a Doily in half. Layer 1/2 of doily over corrugated cardstock using Multipurpose Liquid Glue. Using the Circles Framelit (3-1/8″ diameter) die cut a piece of Vellum. Attach over doily. Attach the remaining doily over the Vellum using a dimensional. Using a thread from Jute ribbon, coil and attach over doily.
- Punch a 2-1/2″ circle from Watermelon Wonder cardstock. Layer over doily.
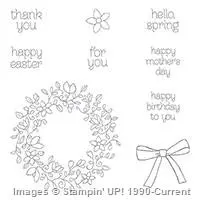
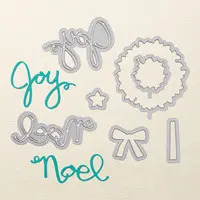
- Stamp wreath image using the Circle of Spring stamp set using Archival Basic Black ink onto Shimmery White cardstock. Die cut using Wonderful Wreath Framelit Dies. Color wreath using a Blender Pen and the following inks: Watermelon Wonder, Pear Pizzaz, Mossy Meadow, Daffodil Delight.
- Create a banner using Typeset DSP (1/4 x 6). Fold Typeset DSP in half and attach to the Wreath. Using a thread from Jute ribbon, coil and attach to Typeset DSP.
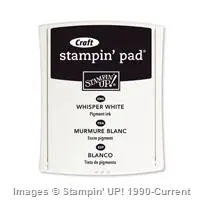
- Stamp “Mother’s Day” from the Crazy about You stamp set using Whisper White craft ink. Emboss with White Embossing Powder and Heat. Trim “Mother” from greeting. Adhere over coiled thread using a dimensional.
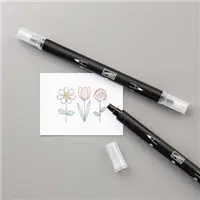
- Splatter Watermelon Wonder ink over image using an Aqua Painter.

Click the product links below to shop for your favorites from this project.
Artisan Hop!
I hope this inspires you to create your own fun box for Mother’s Day. This project took less time that anyone could imagine and the reason was the Gift Box Punch Board is a GEM. It’s a product that packs a lot of punch (ha ha) and creates beautiful boxes.
Thank you so much for stopping by today. Next on the hop is Krista. I can’t wait to see what she has in store for us today.


Important News!
- The retired list for this year has been RELEASED!! Click HERE to view!
- Remember, all accessories are while supplies LAST. Get your order in quickly if there is something you want.
- Place an order in my Online Store and receive an EXCLUSIVE Online Class and a FREE gift for choosing me as your demonstrator. The May gift is GORGEOUS!


12 thoughts on “Mother’s Day Box & Mini Album”
OMG…Kimberly I want to make this! I can’t wait to watch the video tutorial!
These are AWESOME! Wish I was your mum so I could get that card! It’s a beauty! x
I LOVE THIS! Once a year, I try to find someone doing something TOTALLY AWESOME for Mother’s Day and case it. You, my friend fit the bill this year! I know your mom will LOVE this!
I would like to follow your blog on email. Thank you?
Great gift for your mom, she will love it! One question, what did you do to make your pictures that size?
Oh Wow Kimberly!! I love this!! So cute I know your mother is going to LOVE it!! I only wish my mother had one too! LOL
Hi Karen. I would love for you to subscribe. On the right side of my blog you will see an area to enter your email for Feedblitz to receive my blog updates in your email. I hope you will subscribe. If you have any problems please let me know. XOXO
Thank you so much. It’s super easy. I hope you try to make it. XOXO
Mary, I use the Project Life app on my phone and then I print using my Canon Selphy. If you click this video I share how I did it. 🙂 https://youtu.be/fRE6ccm7fSs
Thank you Connie. You are always SO SO sweet. XOXO
Thanks for making my day. Love you my friend. XOXO
Absolutely gorgeous, love it.
Comments are closed.